
Creating custom beautiful forms is something SharePoint developers and designers work day in and day out.
Until now, if you had to design a simple SharePoint Add/Edit/View form, the choices were only through customization - PowerApps, Spfx, InfoPath, SharePoint Designer, JQuery with Content Editor.
But now, you can quickly convert the plain SharePoint Online List form to a more appealing one using JSON formatting, with your organization branding. Using JSON formatting, you can add header, footer and sections to group columns together.
This only customizes the look and feel of the list form and does not change the data in list item or file.
Anyone with create and manage view permission on a list can use form configuration to configure the form with header, footer and body with sections.
SharePoint allows Column Formatting and View Formatting using JSON. Now you can extend the same logic to even customize and format list forms - Newform.aspx, Editform.aspx, Dispform.aspx
Example to customize SharePoint Online List form using JSON
Consider we have a custom SharePoint List "Employee" with these columns -- Employee Name (Single line of text)
- Employee ID (Number)
- Designation (Single line of text)
- Department (Choice)
- Email (Single line of text)
- Mobile (Single line of text)
- Address (Multiple lines of text)
- Blood Group (Choice)
- Emergency Contact (Single line of text)

Navigate to your list "Employee" and click on Edit Form --> Configure Layout.
We will apply JSON formatting in the sections shown here (Header, Body, Footer).

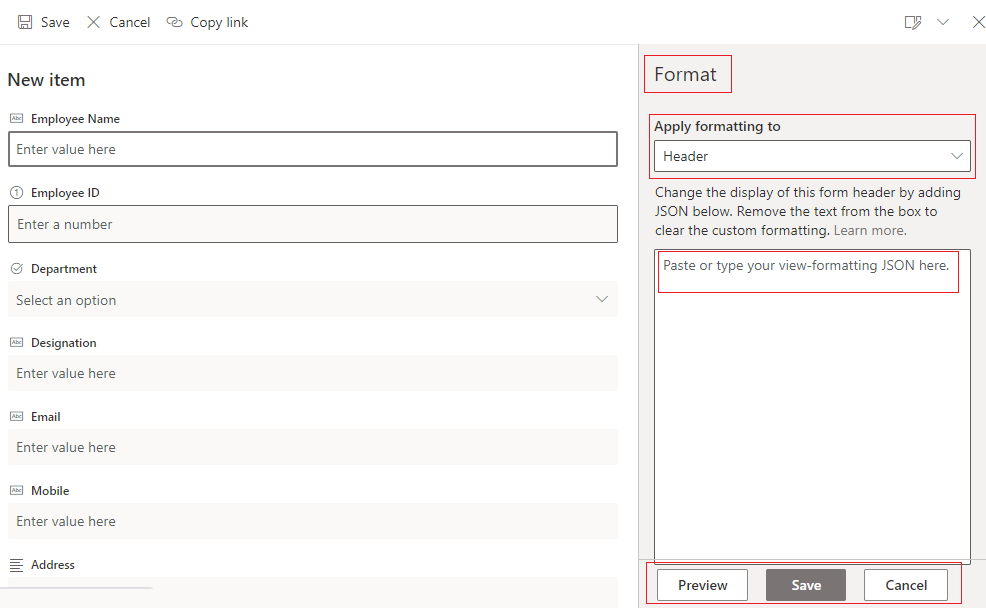
✔️ Header formatting
Select "Header" form the dropdown and paste below JSON code. This will add an icon and heading to the top header section of the form. We will also append the Employee Name column value to the form Title, yes that's exactly how you would do for List View formatting.{
"elmType": "div",
"attributes": {
"class": "ms-borderColor-neutralTertiary"
},
"style": {
"width": "99%",
"border-top-width": "0px",
"border-bottom-width": "1px",
"border-left-width": "0px",
"border-right-width": "0px",
"border-style": "solid",
"margin-bottom": "15px",
"background-color": "orange"
},
"children": [
{
"elmType": "div",
"style": {
"display": "flex",
"box-sizing": "border-box",
"align-items": "center"
},
"children": [
{
"elmType": "div",
"attributes": {
"iconName": "Group",
"class": "ms-fontSize-42 ms-fontWeight-regular ms-fontColor-themePrimary",
"title": "Details"
},
"style": {
"flex": "none",
"padding": "0px",
"padding-left": "10px",
"height": "40px",
"color": "white"
}
}
]
},
{
"elmType": "div",
"attributes": {
"class": "ms-fontColor-neutralSecondary ms-fontWeight-bold ms-fontSize-24"
},
"style": {
"box-sizing": "border-box",
"width": "100%",
"text-align": "left",
"padding": "21px 12px",
"overflow": "hidden",
"color": "white"
},
"children": [
{
"elmType": "div",
"txtContent": "='Employee Details - ' + [$EmployeeName]"
}
]
}
]
}
✔️ Footer formatting
Select "Footer" form the dropdown and paste below JSON code. This will add a copyright text in the bottom footer section of the form. You can add other tags like links in the footer, say to navigate to a user manual.{
"elmType": "div",
"style": {
"width": "100%",
"text-align": "left",
"overflow": "hidden",
"border-top-width": "1px"
},
"children": [
{
"elmType": "div",
"style": {
"height": "15px",
"width": "100%",
"color": "#fff",
"font-size": "13px",
"border-top": "5px solid #eee",
"background-color": "orange",
"padding": "10px"
},
"children": [
{
"elmType": "a",
"txtContent": "© copyrights 2021"
}
]
}
]
}
✔️ Body formatting
Select "Body" form the dropdown and paste below JSON code. This will divide the form into 3 sections and add respective columns in those sections. That's it, you cannot apply any further formatting to the section yet.{
"sections": [
{
"displayname": "Primary details",
"fields": [
"Employee Name",
"Employee ID",
"Department",
"Designation"
]
},
{
"displayname": "Contact",
"fields": [
"Email",
"Mobile"
]
},
{
"displayname": "More Details",
"fields": [
"Address",
"Blood Group",
"Emergency Contact"
]
}
]
}
The changes will apply to all 3 forms - New, Edit, Display. You can try various other styles, formatting to make the form more beautiful. Always "Preview" to make adjustments before you save, saved changes are visible to all users.
A few limitations with list form customization using JSON are - the form width increases and it looks wider, styles cannot be applied to the Body section yet, you cannot manipulate fields (like visibility - show/hide). That may or may not be part of Microsoft's roadmap.
This is how the final form looks with values.

Have Questions? Post them here!
Provide Feedback For This Article
We take your feedback seriously and use it to improve our content. Thank you for helping us serve you better!
😊 Thanks for your time, your feedback has been registered!
Comments & Discussion
Facing issues? Have questions? Post them here! We're happy to help!