There are various ways to access your Sharepoint data remotely, like Client Object Model, PowerShell, REST API's, Graph API's, etc. But what is common in all these models is the credentials, you need to authenticate and authorize the remote App/program by providing a valid combination of User + Password, which can access the SharePoint content.
REST API and OAuth are developer's favorite choice for interacting with external data.
SharePoint uses OAuth to authorize using a token (client id + client secret) instead of regular credentials, giving access to a site, list, library, tenant, other. Further, you can decide what permission the App (or Add-in) has - like read, full control.
SharePoint App-Only works for SharePoint Online and SharePoint on premises versions (2013/2016/2019). Let us look at the steps required to set up an app principal with desired permissions.
⚡️ Generate Client Id and Client Secret (AppRegNew.aspx)
- Navigate to your SharePoint site, say https://c2c.sharepoint.com/sites/SPDev.
- Open the App registration, append /_layouts/15/appregnew.aspx to the site address.
- This will open a new page asking for App information.
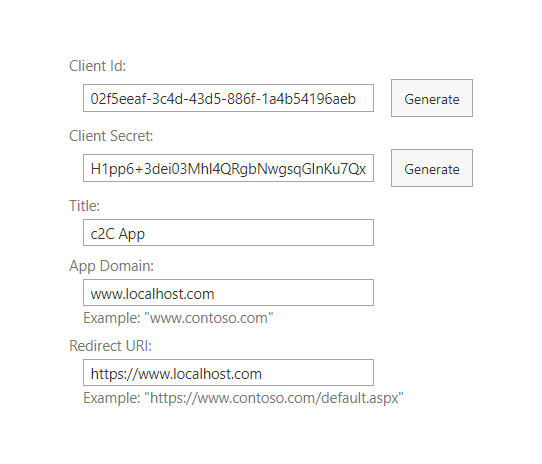
- Fill the required details -
- ✏️ Client ID = GUID for the SharePoint App. Click Generate.
- ✏️ Client Secret = Password for the App. Click Generate.
- ✏️ Title = Provide a user friendly display name for the App.
- ✏️ App Domain = Remote server host of the App. Use www.localhost.com if you don't have one.
- ✏️ Redirect URL = Remote application end point. Use https://www.localhost.com if you don't have one.
- You will see a message "The app identifier has been successfully created." with all details.
Copy and save the client id and client secret, its required in the next step.

⚡️ Grant permissions to the newly created App (AppInv.aspx)
- To set permissions for the the app, append _layouts/15/appinv.aspx to the site address.
- This will open a new page.
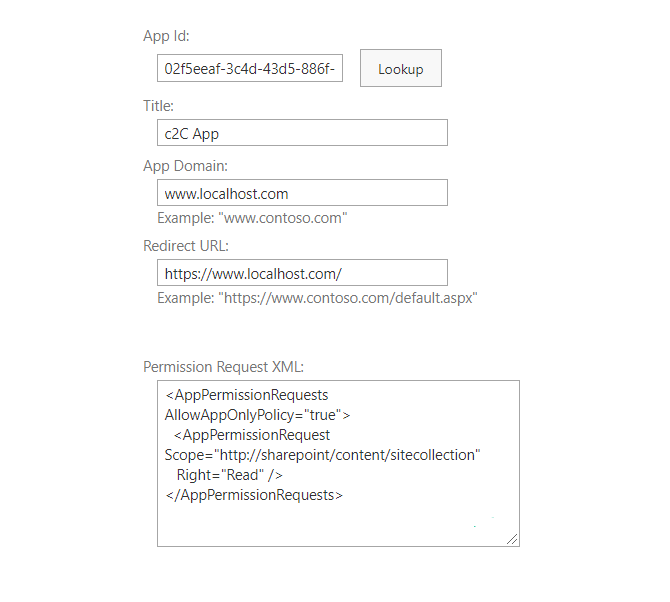
- Paste the Client Id in the App Id field and click Lookup.
- This will fetch and present all details for the Client Id provided.
- Provide the Permission Request XML specifying what access the App has. The XML structure is a below.
- TENANT = http://sharepoint/content/tenant
- SITE COLLECTION = http://sharepoint/content/sitecollection
- SUB SITE = http://sharepoint/content/sitecollection/web
- LIST/LIBRARY = http://sharepoint/content/sitecollection/web/list
- Read = only read access
- Write = add/edit/delete
- FullControl = full permissions
- Click Create.
<AppPermissionRequests AllowAppOnlyPolicy="true">
  <AppPermissionRequest Scope="[SCOPE]" Right="[PERMISSION]" />
</AppPermissionRequests>Right can have following values (use as is, do not modify),

⚡️ Trust the SharePoint App
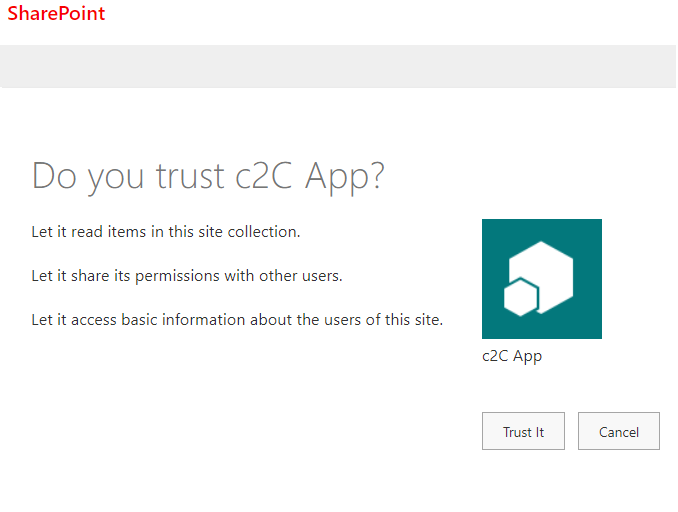
- You will be taken to next screen with message "Do you trust App?".
- It also shows what access the App will have depending on the permissions provided.
- Click Trust It.
- You App is ready to be used.
- You can see all you trusted Apps from _layouts/15/appprincipals.aspx?Scope=Web.

⭐ Test the SharePoint REST API using Postman
Now that we have registered SharePoint App/Add-in, its time to test it!Our friend "Postman" comes handy to quickly test the SharePoint connection and REST query before actually using it in the code.
Refer this article for detailed steps on how to use Postman to generate bearer token and test SharePoint REST API Access SharePoint Online REST API using Postman
Have Questions? Post them here!
- SharePoint error - An exception occurred when trying to issue security token: This implementation is not part of the Windows Platform FIPS validated cryptographic algorithms..
- PowerShell iterate and get all SharePoint sites and sub sites
- SharePoint Online: Editing session has ended Message
- How to Share Microsoft SharePoint Site with Users or Groups
- How to delete SharePoint Online List Item using REST API
- SharePoint List excel import - This table exceeds the maximum number of supported rows
- How to disable SharePoint subsite creation option for owners
- SharePoint 2010 August 2015 Update KB3055049 - Duplicate Document ID issue bug fixed
- SharePoint Server 2016 Preview installation error - This Product Key isn't a valid Microsoft Office 2016 Product Key. Check that you've entered it correctly.
- How to upload file programmatically to SharePoint Document Library using Server Object Model C# .Net
- Access URL for SharePoint Tenant Admin Center (Online Office 365)
- Error when deleting SharePoint Online folder or file
- How to extend retiring SharePoint 2010 Workflows and continue with Office 365
- How to generate client id and secret to register SharePoint App with OAuth
- How to delete SharePoint List Item programmatically using C#.Net
- How to retrieve all SharePoint Online List Items using Rest API
- [Solved] SharePoint Search Internal server error exception
- Create SharePoint Site Collection using PowerShell New-SPSite
- Fix SharePoint PowerShell error - The term Get-SPweb is not recognized as the name of a cmdlet function script file or operable program
- How to enable anonymous public access for SharePoint Online site collection, file, folder without login ?
- SharePoint Server 2016 installation System Hardware requirements
- How to create SharePoint Online List Item using REST API
- Changed AD user display name showing old name in SharePoint
- Recommended size and resolution for SharePoint Online Site logo
- Microsoft 365: How to Turn Off Delve in SharePoint Online for All Users
- How to convert Python datetime object to a String - Python
- Open .bash_profile File in TextEdit using Terminal - MacOS
- Steps to Integrate Latest Facebook SDK with your Android Application - Facebook
- Relative Imports examples in Python 3.x - Python
- How to send WhatsApp message from your Android App using Intent - WhatsApp
- Calculate Area and Circumference of Circle - C-Program
- How to install Anaconda on Mac (M1/M2 Mac) - Python
- [Fix] Java Exception with Lambda - Cannot invoke because object is null - Java