The AWS DynamoDB Calculator can be overwhelming if you're not familiar with all of DynamoDB's features and what they are meant for. It's important to have a good understanding of the options available in order to use it effectively.
In this article, I'll go through each of the options available for "DynamoDB on-demand capacity" and walk you through how to calculate the monthly cost of DynamoDB based on these different parameters. This will help you better understand the costs associated with using DynamoDB and how to configure it for optimal performance and cost-efficiency.
Step by Step Guide
Step 1: Go to the AWS Calculator webpage
AWS Calculator Link: https://calculator.aws/#/addService
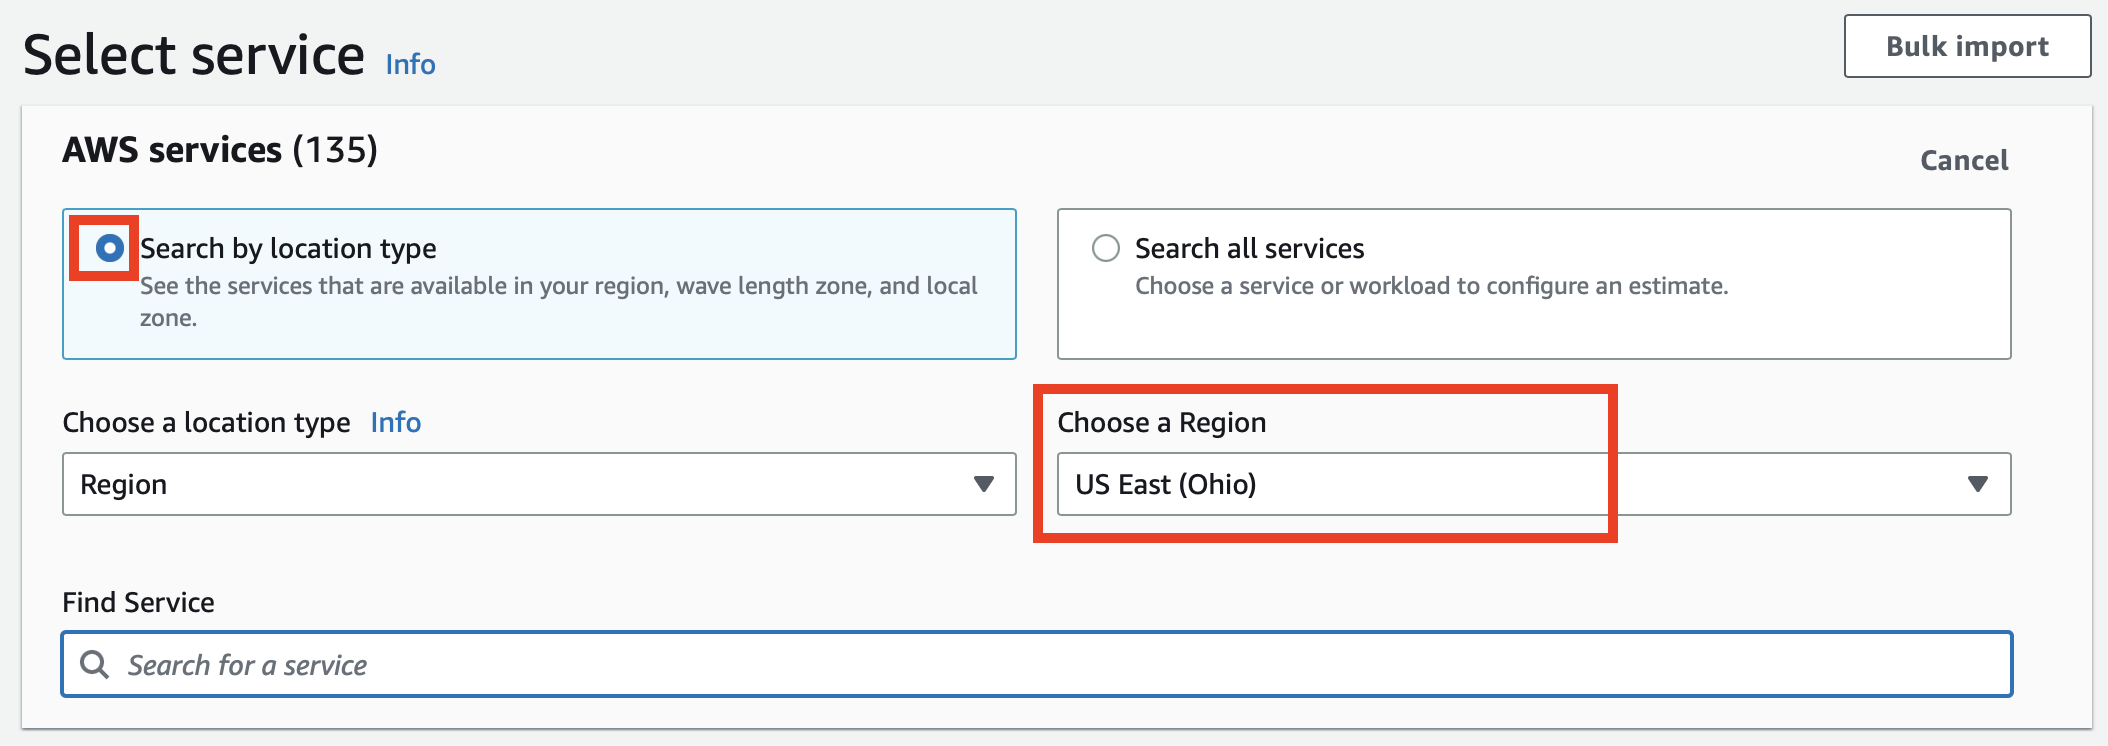
Step 2: Set our location and AWS Region
- Search by Location Type (default selection): It's better to choose this option because sometimes you may be required to use an AWS service in a specific AWS Region, and the service you're looking for may not be available there. Therefore, it's a good option to make you aware of that!
- Search All Services: This option lets you search for an AWS service regardless of the AWS regions.
Here you will see two options,
Code	        Region Name
us-east-2	US East (Ohio)
us-east-1	US East (N. Virginia)
us-west-1	US West (N. California)
us-west-2	US West (Oregon)
af-south-1	Africa (Cape Town)
ap-east-1	Asia Pacific (Hong Kong)
ap-south-2	Asia Pacific (Hyderabad)
ap-southeast-3	Asia Pacific (Jakarta)
ap-southeast-4	Asia Pacific (Melbourne)
ap-south-1	Asia Pacific (Mumbai)
ap-northeast-3	Asia Pacific (Osaka)
ap-northeast-2	Asia Pacific (Seoul)
ap-southeast-1	Asia Pacific (Singapore)
ap-southeast-2	Asia Pacific (Sydney)
ap-northeast-1	Asia Pacific (Tokyo)
ca-central-1	Canada (Central)
eu-central-1	Europe (Frankfurt)
eu-west-1	Europe (Ireland)
eu-west-2	Europe (London)
eu-south-1	Europe (Milan)
eu-west-3	Europe (Paris)
eu-south-2	Europe (Spain)
eu-north-1	Europe (Stockholm)
eu-central-2	Europe (Zurich)
me-south-1	Middle East (Bahrain)
me-central-1	Middle East (UAE)
sa-east-1	South America (São Paulo)
I have selected the region as US East Ohio (us-east-2) based on my requirements. It is important to note that the cost will vary based on the pricing of service at a particular region.
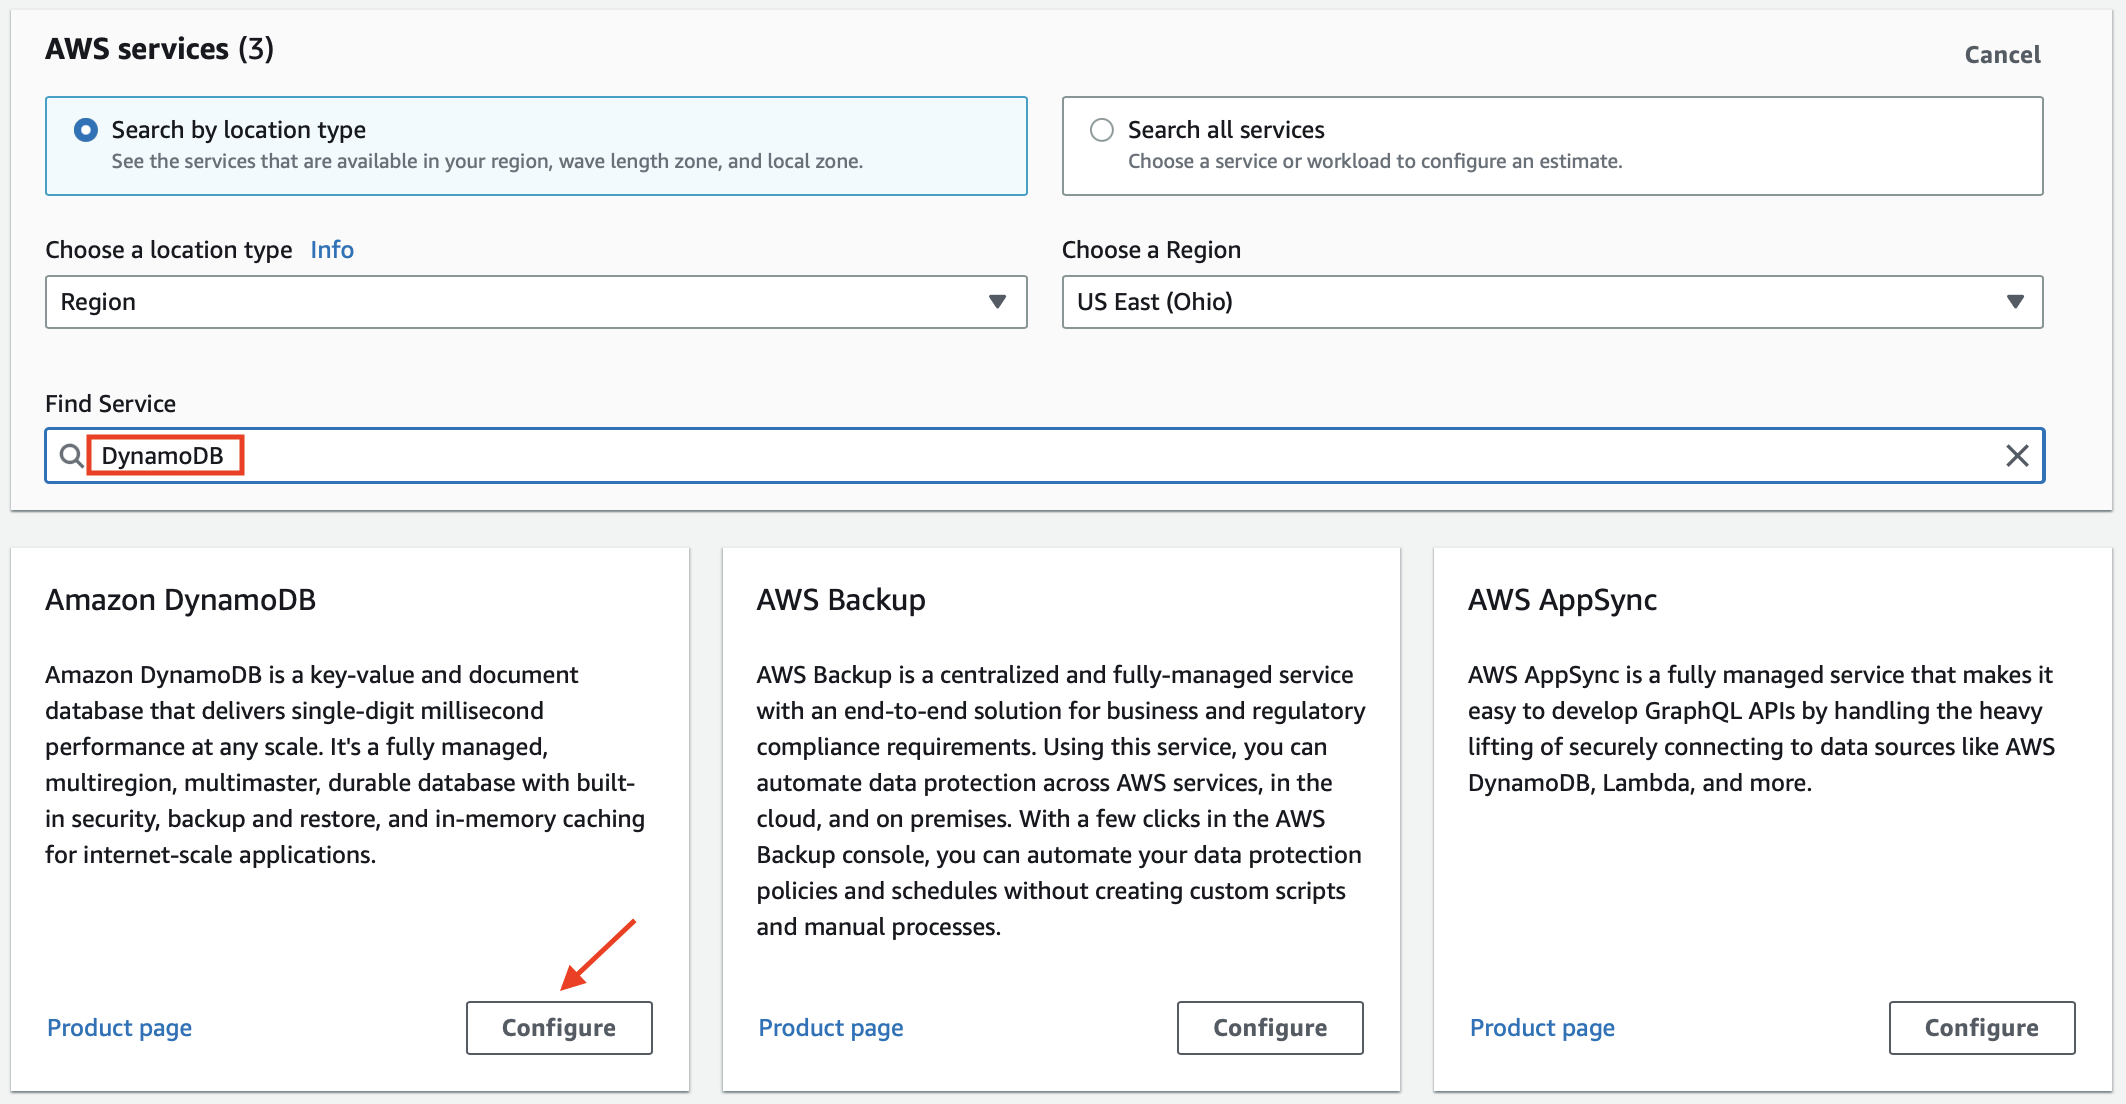
Step 3: Search our Service DynamoDB
Now that we have set our AWS Region, search for DynamoDB in Find Service text box. You will see options as filtered results, make sure to click on Configure button of option "Amazon DynamoDB"

Step 4: Configure Amazon DynamoDB
- Standard Table Class:
- This option is pre-selected by default as the default choice.
- For most of the use cases you will select the standard option which is recommended by AWS for the vast majority of workloads.
- Example of Standard data tables: social media user profile info table, e-shopping website products table.
Some important points to note before choosing Standard v/s IA Table Class
- DynamoDB Standard table class is the most cost-effective option for tables where throughput is the dominant cost, offering lower throughput costs than DynamoDB Standard-IA.
- DynamoDB Standard-IA table class is the most cost-effective option for tables where storage is the dominant cost, offering lower storage costs than DynamoDB Standard.
- If storage exceeds 50% of the throughput cost of a table using the DynamoDB Standard table class, switching to DynamoDB Standard-IA can help reduce the total table cost.
- DynamoDB Standard-IA tables offer the same performance, durability, and availability as DynamoDB Standard tables.
- Switching between DynamoDB Standard and DynamoDB Standard-IA table classes does not require changing your application code, as you can use the same DynamoDB APIs and service endpoints for both.
- DynamoDB Standard-IA tables are compatible with all existing DynamoDB features, including auto scaling, on-demand mode, TTL, on-demand backups, PITR, and global secondary indexes.
- Standard-Infrequent Access:
- Select this option, only if the data to be stored in the table is to be accessed infrequently.
- This is a great option to save cost, provided the data is to be accessed infrequently.
- Example of Standard-Infrequent Access data tables: log tables, audit tables, order history.
You will now get an overlay modal that you have the details about the calculation of DynamoDB Cost.
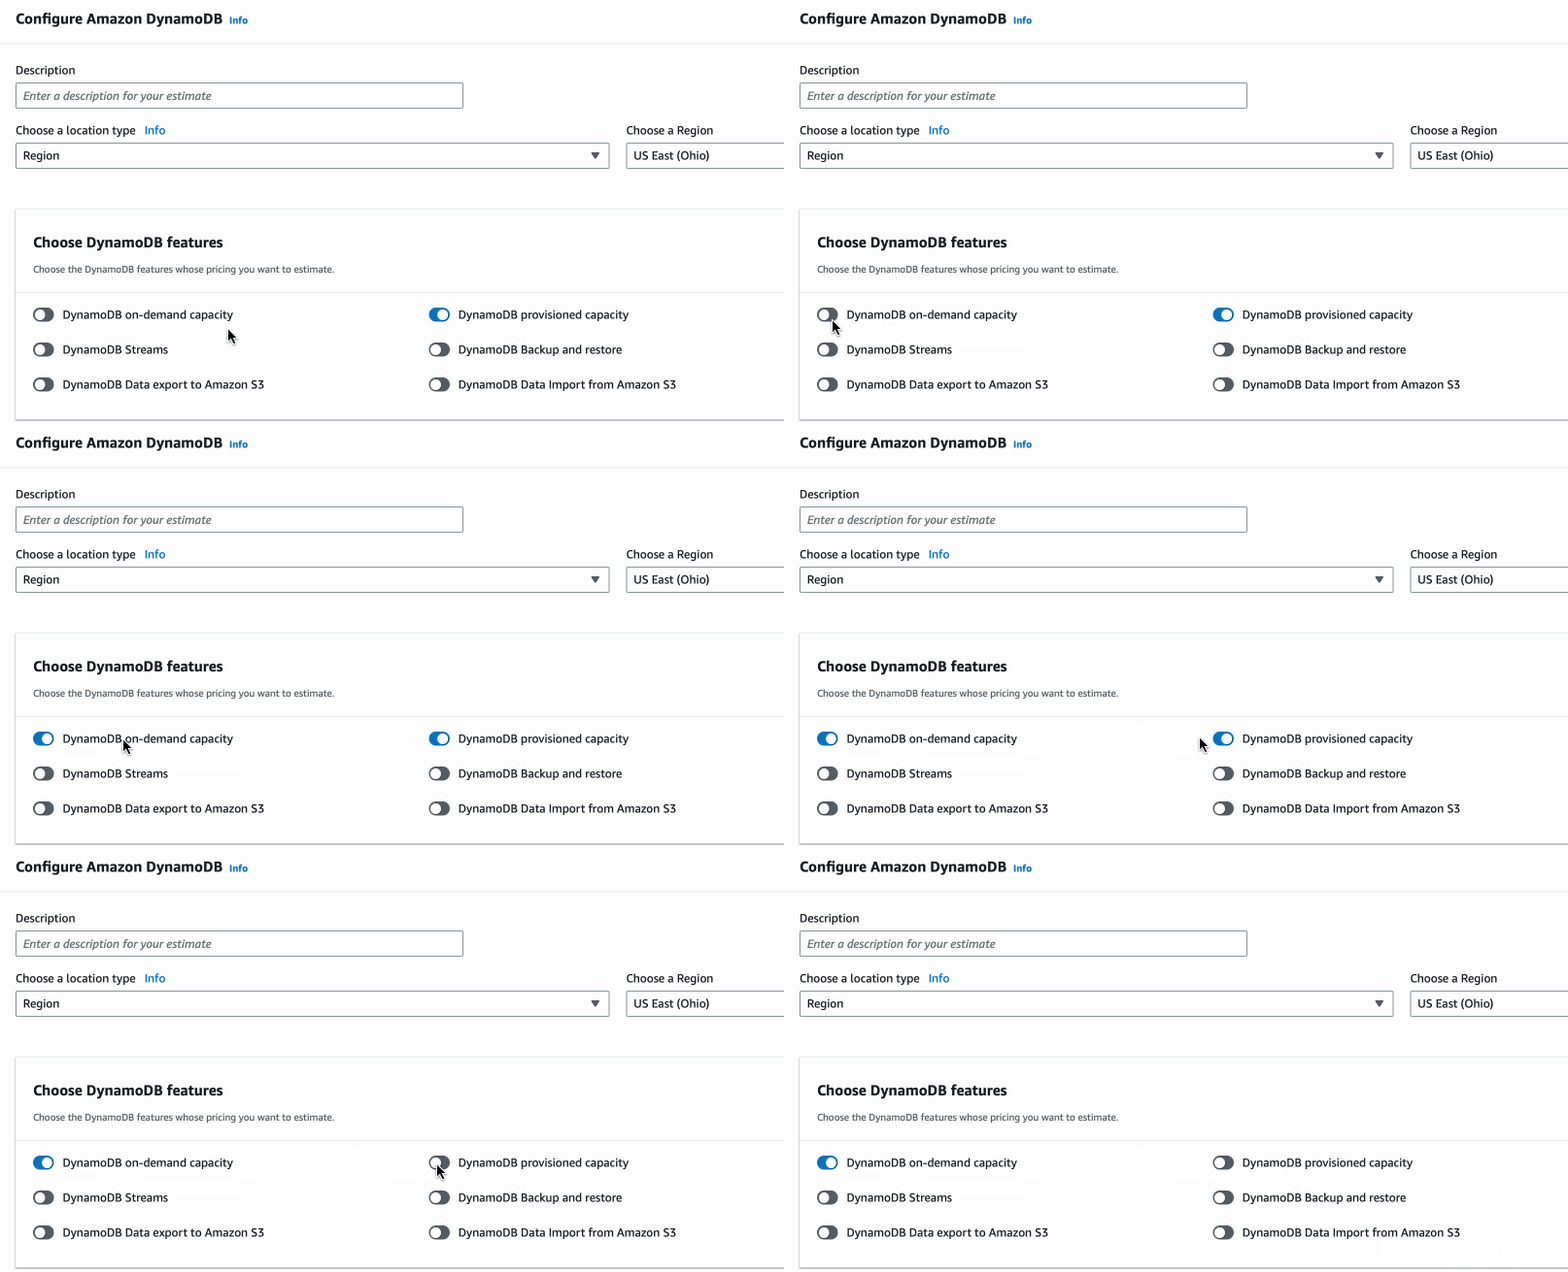
a. Filling in Choose DynamoDB features
Make sure to Enable the "DynamoDB on-demand Capacity" option and disable "DynamoDB provisioned capacity" as shown in the below gif image.

b. Filling in the "Table Class"
In AWS DynamoDB every table is associated with a table class, there are two table classes available which you have to select wisely to optimize cost while keeping in mind the access frequency of data/table.
Note: The option you select for table class is not permanent, you can anytime go and change it via the AWS Console/SDK/CLI.
Must read related articles:
- https://docs.aws.amazon.com/amazondynamodb/.../HowItWorks.TableClasses.html
- https://docs.aws.amazon.com/.../developerguide/WorkingWithTables.tableclasses.html
Step 5: Filling in Data storage
- Data storage size: This is the total size of all tables that you want to consider in DynamoDB. The values are to be in GB or TB.
- Average item size (all attributes): This once can be a tricky one. Based on the purpose of the table(s), you need to give a fair guess of how much a single item of your table would take space in KB.
Item:{ "id": {"S": "1001001"}, "userName": {"S": "mikey23"}, "userFirstName": {"S": "Mike"}, "userFirstLast": {"S": "Alan"}, "userDept": {"S": "IT"}, "userCity": {"S": "NYC"}, "userRoles": { "SS": [ "Admin", "Developer", "DBA" ] } }The above is an example of an Item. Assuming that family all our items have a fixed no. of columns, here are some stats,
- This item has 7 attributes.
- The size of this item is 105 bytes.

1 Unit = 4Kb so it will consume,

- 1 RCUs when being read with strong consistency.
- 0.5 RCUs when being read with eventual consistency.
- 2 RCUs when being read as part of a transaction.
- 1 WCUs when being written.
- 2 WCUs when being written as part of a transaction.
Now let's try to get an item that is huge.
item{ "id": { "S":"05eb9c12-9ec8-44b5-bc36-6da7b1090b1a"}, "data": { "S" :"KZXQAT0BL5R5Y0MYY...ASAKSFJ-HUGE-TEXT }- This item has 2 attributes. - The size of this item is 5.3 KB. 1 Unit = 4Kb so it will consume 2 Units, - 2 RCUs when being read with strong consistency. - 1 RCUs when being read with eventual consistency. - 4 RCUs when being read as part of a transaction. - 6 WCUs when being written. - 12 WCUs when being written as part of a transaction.

I have added the size of the item as 4 KB and Data storage size as 10 GB.
As the us-east-2 region has a storage cost of $ 0.25 per GB per month, we have a storage cost of 0.25 X 10 = $ 2.5 per month
Step 6: Write settings
Here you need to provide Specify write consistency of your workload.
- Non-transactional writes: It refers to operations that modify or create data in a table without the use of transactions. Non-transactional writes can be performed using the PutItem, UpdateItem, and DeleteItem APIs.
- Transactional writes: Refer to a set of operations that allow you to write multiple items as a single atomic transaction, ensuring that either all the writes succeed or none of them do. Transactional writes can be used to maintain data consistency and integrity, especially when dealing with complex business logic that requires multiple write operations.
- Baseline write rate: The number of writes per second that your workload needs during off-peak periods.
- Peak write rate: The maximum number of writes per second that your workload needs during peak periods.
Facing issues? Have Questions? Post them here! I am happy to answer!
Rakesh (He/Him) has over 14+ years of experience in Web and Application development. He is the author of insightful How-To articles for Code2care.
Follow him on: X
You can also reach out to him via e-mail: rakesh@code2care.org
- Get the total size and number of objects of a AWS S3 bucket and folders
- How to Create AWS SNS Topic using AWS CLI
- Fix: Amazon Linux bash: sudo: command not found
- [Solution] AWS Java SDK S3 AmazonS3Exception InvalidAccessKeyId
- Create an AWS User using CLI2 Command at a specific Path
- Fix: Missing the following required SSO configuration values: sso_start_url, sso_region
- Fix: zsh: command not found: aws (Mac/macOS)
- Configure AWS Access ID and Secret Keys using CLI on Mac
- Quick way to setup AWS DynamoDB locally on macOS
- Most Essencial AWS CLI 2 S3 ls Command Options
- How to Check AWS SNS Permissions using CLI
- AWS CLI Change Default Output Format
- How to install AWS CLI on Ubuntu
- Quick way to install AWS CLI for macOS Terminal
- Install AWS CLI using Brew Command
- AWS CLI Command to Get a List of SNS Topics
- Get List of AWS SNS Topic Subscriptions using CLI
- How to Setup AWS Credentials using Visual Studio Code
- Installing AWS CLI Version 2 on macOS Sonoma using Terminal
- AW3 CLI command to get list of all region names
- AWS SNS CLI Command Publish Message Attributes
- Create an S3 bucket in a specific AWS region using CLI Command
- [Fix] zsh: command not found: awscli [Mac Terminal]
- Understanding AWS Calculator: DynamoDB on-demand capacity
- [Solution] com.amazonaws.dynamodb.v20120810 MissingAuthenticationToken Key Id or X.509 certificate
- 5 Reasons Why Jupyter Notebook is Not Opening and Solutions - Python
- [fix] zsh: illegal hardware instruction python TensorFlow M1/M2 Mac - zsh
- Find Sum of two numbers - C-Program
- How to add Solver Add-in in Microsoft Excel on Mac - Windows
- [fix] Docker Desktop App not starting on Mac (macOS) - Docker
- How to deep copy a dictionary in Python - Python
- Auto Refresh Webpage after every x Second or Minute using Meta Tag? - Html
- How to know which version of macOS Sonoma you are using - MacOS