As there is no Print Screen button on a Mac Keyboard as you may find on Windows, you can either use Keyboard shortcuts or make use of the available Menu Options that we can use to capture screens.
Here is how you can take a screenshot on a Mac (like what we call print screen on Windows) without Keyboard
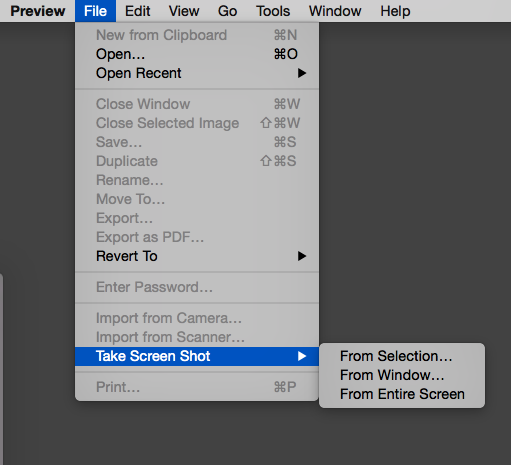
1. Preview App: If you do not want to use keyboard key combinations to take a screenshot (print-screen/screen capture) there is an option available using Preview App
- Goto Spotlight Search and look for Preview App and open it,
- Now you must see that Preview Menu bar is loaded
- Now goto File -> Take Screenshot

There are 3 options available,
- From Selection
This will make the cursor pointer as a cross-wire, when you click and drag a portion of the window gets selected and will be displayed with Preview App.
- From Window..
When you select this option, your mouse pointer turns into a Camera icon and it highlights the selectable windows that are available on the screen, when you click, the selected window is captured and displayed with Preview App.
- From Entire Screen
When you select this option, you would see that a message is popped up at the center of the screen saying "Countdown to Screenshot has started" and after few seconds the entire window image is taken displayed with the Preview App.
⛏️ Advantage of taking a Screenshot with preview App.
There are a few advantages of taking a Screen Shot using the Preview App,
- It lets you edit the image on a go, before being saved. It lets you do some basic editing on the image like rotation, cropping, adding text, and so on ..
- You can save the image in formats other them Png like JPEG, JPEG-2000, OpenEXR, PDF, and TIFF.
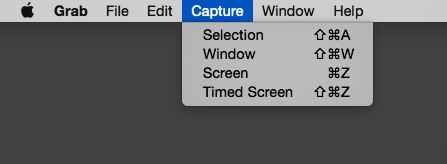
2. Grab App: There is another application that lets you take screenshots, you may find it under /Applications/Utilities/
a. Open Grab (type Grab in Spotlight search)
b. Now on the Grab menu, select Capture, you get the following options,
- Section
- Window
- Screen
- Time Section

✌️This works on all Mac computers: iMac's, Mac Mini, Macbook Air's or Pros running macOS (Catalina, Mojave, Big Sur)
Have Questions? Post them here!
- Transfer files between Android and Mac OS X using usb cable
- Find Java JRE Installation location Mac OS X
- How to enable Do Not Disturb mode for Notification Center in Mac OS X 10.10 Yosemite
- Remove Applications from Startup Mac OS X
- Open New tab using keyboard shortcut in Mac Terminal
- Create a large dummy file using Mac OS X terminal command
- Hide files and folders on Mac OS X
- Install Apache Tomcat ver 8 on Mac OS X Yosemite 10.10
- Location of eclipse.ini file on Mac OS X
- Take Screenshots on Mac OS without Keyboard
- [Solved] Dynamic Web Module 3.0 requires Java 1.6 or newer Mac OSX
- Mac OS X Taking Screen Capture using Terminal
- How to Stop Photos App from auto loading when device connected to the Mac
- Change Mouse Scrolling in Mac OS X
- How to Setup maven on Mac (macOS)
- Mac Studio Display Buzzing sound from the Monitor
- 4 Open Source SQLite Editor for Mac OS X , Windows and Linux
- Save webpage as pdf in Google Chrome for Mac OS X
- vi undo redo command [Examples]
- How to See Hidden Folders and Files on macOS
- [Mac] To open Eclipse you need to install the legacy java se 6 runtime
- Java location in Mac OS X
- Safari appends .html extension to files that are downloaded
- Pdf Text to Speech option in Mac OS X Preview App
- How to run Gradle from Mac Terminal (Command Line)
- Fix Power BI error Access to the resource is forbidden when connecting SharePoint Online List as data source - SharePoint
- How to reset Eclipse IDE Code Font - Eclipse
- Java 8 Supplier Functional Interface Examples - Java
- Fix: error: non-static type variable T cannot be referenced from a static context - Java
- How to turn off Stage Manager - macOS Ventura - MacOS
- 🎃 Halloween Hashtag 2022 on Social Media 🎃 - Hashtags
- 25: How to rename a file using Python Program - Python-Programs
- Java Stream Word Count Example - Java