If your application requires internet connection then you need to add permissions to the manifest file AndroidManifest.xml. If you don't do this then your app may crash throwing an exception.
Steps to Add Internet Permissions to Manifest file
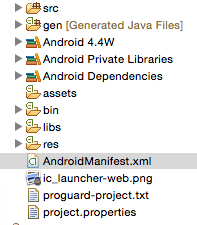
Locate your AndroidManifest.xml file in your project folder,

AndroidManifest_xml.png
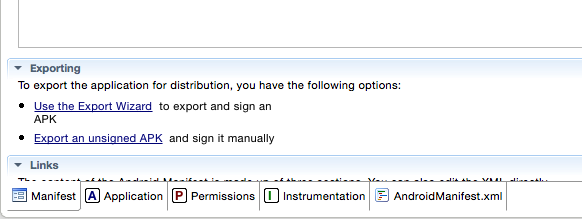
Now you can see tabs at the lower side of the Manifest, click on Permissions,

Select Permissions.png
Now click on "Add" to add a new element to manifest file.
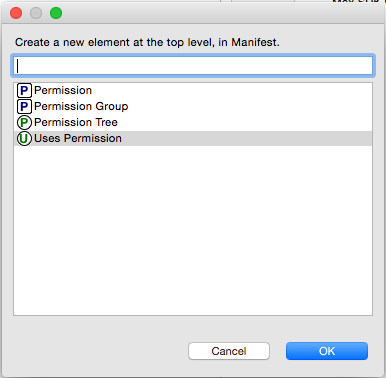
Select User Permission,
Select Users Permission.png
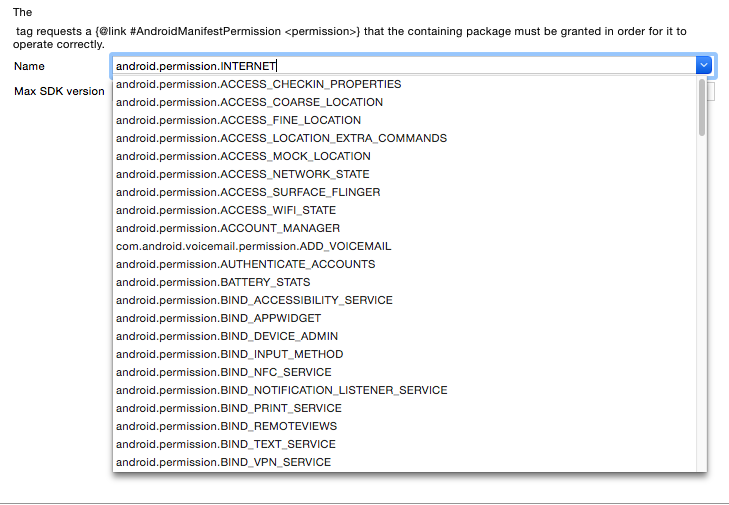
Now you would see Name filed, select: android.permission.INTERNET, You can leave the Max SDK version as blank, but you can set a max API level as say 5.

Add android_permission_INTERNET.png
Now if you see the XML view, you would see,
<uses-permission android:name="android.permission.INTERNET" /> being added below user-sdk tag.
<?xml version="1.0" encoding="utf-8"?>
<manifest xmlns:android="http://schemas.android.com/apk/res/android"
    package="com.example.internetEg"
    android:versionCode="1"
    android:versionName="1.0" >

    <uses-sdk
        android:minSdkVersion="8"
        android:targetSdkVersion="21" />
    <uses-permission android:name="android.permission.INTERNET"/>

    <application
        android:allowBackup="true"
        android:icon="@drawable/ic_launcher"
        android:label="@string/app_name"
        android:theme="@style/AppTheme" >
        <activity
            android:name=".MainActivity"
            android:label="@string/app_name" >
            <intent-filter>
                <action android:name="android.intent.action.MAIN" />

                <category android:name="android.intent.category.LAUNCHER" />
            </intent-filter>
        </activity>
    </application>

</manifest>
More Posts related to Android,
- Increase Android Emulator Timeout time
- Android : Remove ListView Separator/divider programmatically or using xml property
- Error : Invalid key hash.The key hash does not match any stored key hashes
- How to Change Android Toast Position?
- Android Alert Dialog with Checkboxes example
- Android : No Launcher activity found! Error
- Android Development: Spinners with Example
- Failed to sync Gradle project Error:failed to find target android-23
- INSTALL_FAILED_INSUFFICIENT_STORAGE Android Error
- Disable Fading Edges Scroll Effect Android Views
- How to create Toast messages in Android?
- Channel 50 SMSes received every few minutes Android Phones
- Android xml error Attribute is missing the Android namespace prefix [Solution]
- Create Custom Android AlertDialog
- How To Disable Landscape Mode in Android Application
- Android Development - How to switch between two Activities
- incorrect line ending: found carriage return (\r) without corresponding newline (\n)
- Generate Facebook Android SDK keyhash using java code
- Android Error Generating Final Archive - Debug Certificate Expired
- 21 Useful Android Emulator Short-cut Keyboard Keys
- Android RatingBar Example
- 11 Weeks of Android Online Sessions-15-Jun-to-28-Aug-2020
- Download interrupted: Unknown Host dl-ssl.google.com Error Android SDK Manager
- fill_parent vs match_parent vs wrap_content
- Android : Connection with adb was interrupted 0 attempts have been made to reconnect
More Posts:
- Docker - Incompatible CPU detected - M1/M2 Mac (macOS Sonoma) - Docker
- How to install npm on Ubuntu - Linux
- Command to check Last Login or Reboot History of Users and TTYs - Linux
- How to Copy all text to Clipboard in Vim - vi
- Program 38: Store two numbers in variables and print their sum - Python-Programs
- Fix - Microsoft Teams Operation Failed With Unexpected Error - Teams
- Bash Command to Find OS Version in Terminal - Bash
- How to check PowerShell version - Powershell