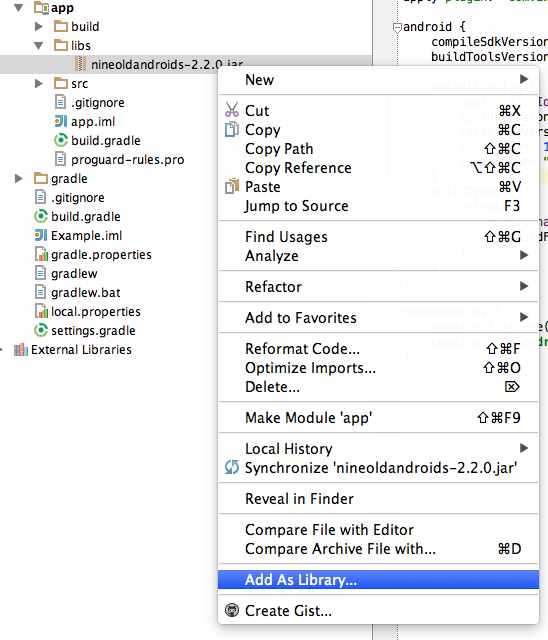
To import an external .jar file in your Android Studio Project, just follow the below steps,
- Move from Android view to Projects view
- Now under app folder you should see libs, if you don't see it, create it
- Drag & Drop the .jar file here, you maybe get a prompt "This file does not belong to the project", just click OK
- Now you should see the jar file under libs folder, right-click on the jar file and select "Add as Library", Click OK for prompt "Create Library"
- That's it!! Now, this jar has been added.
?? We do not need to add the dependency in build.gradle manually unlike previous versions of Android Studio. But to verify, just move to the Android Project View again and check Gradle Scripts -> build.gradle , you should be able to see the jar added under dependencies, nineoldandroids-2.2.0.jar is the jar that I have added.
Gradle example importing jars in Android Studio:dependencies {
compile fileTree(dir: 'libs', include: ['*.jar'])
compile 'com.android.support:appcompat-v7:21.0.3'
compile files('libs/nineoldandroids-2.2.0.jar')
}⚡️ Note that the process to add an external Project Folder to an Android Studio Project is not the same.

add to library
More Posts related to Android-Studio,
- Step-by-Step: How to install Flutter in Android Studio
- [Android Studio] How to locate code for activity_main.xml
- [Event Log] Android Studio performance could be improved
- Android Studio emulator/Device logCat logs not displayed
- Show Android Studio Emulator in a Separate Window
- Android Studio SDK Build-tools 23 rc2 not getting installed
- Android Emulator Screenshot saved location
- [Android Studio] Error: Missing system image on device
- Android Studio NoClassDefFoundError: java.awt.Toolkit
- Android [SDK Manager] The system cannot find the path specified
- [Android Studio] Could not automatically detect an ADB binary
- Installing Android Studio Dolphin on Mac with Apple (M1/M2) Chip
- [Android Studio] MainActivity does not exist
- How to enable line numbers in IntelliJ Android Studio for all files
- Android Studio - Installed build tools revision 31.0.0 is corrupted. Remove and install again using the SDK manager.
- Android Studio setup was canceled - How to resume
- Your Android SDK is missing, out of date or corrupted SDK Problem
- Locate MainActivity Java or Kotlin file in Android Studio
- How to Determine Android Studio Gradle Version
- Delete Android Studio Projects
- [Android Studio] Button on click example
- Create assets folder in Android Studio
- Disabling Spell Check in Android Studio
- How to save IntelliJ IDE Console logs to external log file
- How to install Android Studio Chipmunk and SDK tools on macOS (2021.2)
More Posts:
- [Fix] zsh: command not found: awscli [Mac Terminal] - AWS
- Download Google Chrome setup exe file using PowerShell - Powershell
- New-SPLogFile PowerShell - create new SharePoint log file - SharePoint
- Two Ways to Extract rar (*.rar) files on Mac - MacOS
- Check version of pip package installer for Python - Python
- SharePoint - Use Today's Date Time in list view filter and calculated column - SharePoint
- Notepad++ Save Failed - Please check if this file is opened in another program. - NotepadPlusPlus
- How to fix Microsoft Windows 10 update error 80070020 - Microsoft